Keeping Your Blog Private
New Feature Allows for Password Protected Blogs
January 29, 2022Greetings Silvrbackers and Best Wishes for the New Year,
I don't know about you but for me it has been a couple of years of disruption. And that has certainly affected my focus on new initiatives for Silvrback. I am happy to announce the release of a little feature that only a few writers will appreciate and that is the ability to operate a blog that is only available to those the writer invites.
This amounts to a private blog which allows the account holder to password-limit access to his/her blog content. Yeah, I know, who would want to do that?
Uses for Private Blogs
Some writers seek a setting that allows them to record their thoughts and ideas in a central location. While there are many media and ways that can serve this purpose, the blogging platform not only provides a safe keeping of this content but it allows for options to make the content available to an audience for reaction and interaction. That is, it allows the writer to invite comment, reaction or criticism of the content, whether that be a book chapter or an article. In the end, the writer can control the access more systematically.
The content is also transportable to other media. Ultimately the content can also be made public for broader viewing if desired.
A second use for a private blog is as a personal diary. It makes for a digitally formatted diary that can be transported to other places and formats, but is preserved in a relatively secure location on a Silvrback server.
Anyhow, let's talk about what we've done so that if this might be something for you, you can access it and get started.
How to Use the Feature
First, the default position for any Silvrback blog is public. So no changes are required for existing users. Your blog is available to the public. If you choose to take your blog private, then here is what you need to do.
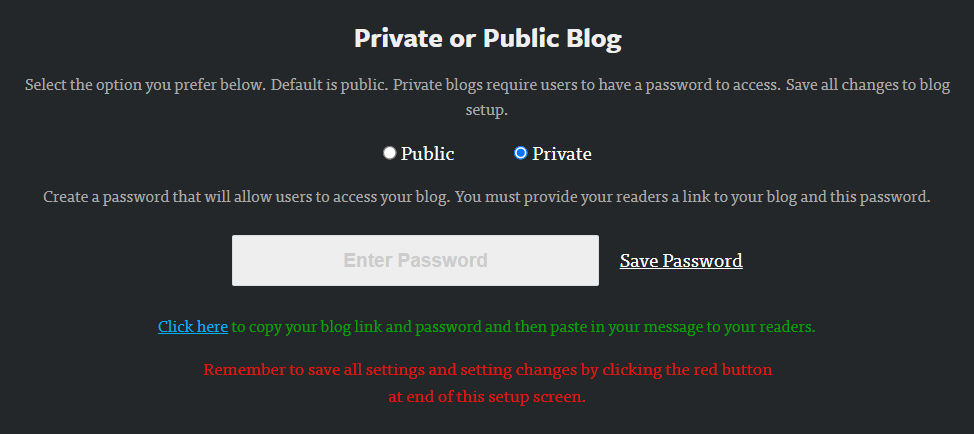
1) In your blog account, go to blog setup and scroll down to the section labeled 'Private or Public Blog'. See screenshot below.
2) When you select the private option, an additional section opens up which calls for you to enter a password you wish to use to access your blog. Save that password by clicking the save password link to the right of the password field.
Note that this saves the password and not the private - public setting for your blog. This means that to make this setting effective in your blog you still need to save the setting by clicking the red button at the bottom of the blog settings screen (just like you save all settings and changes to settings in this setup screen).
What the save here allows you to do is not only save the password, but also to copy your blog link and password and paste it into an email to send to the potential readers you invite, if any.
Check out the screenshot below.

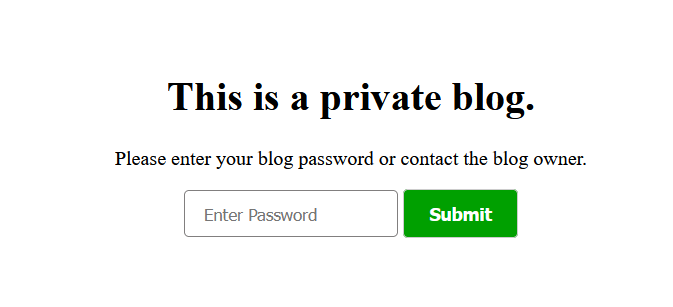
When you have properly saved the private blog setting your blog should now be private. When a prospective reader comes to your blog, they should see a page that looks like the following.

Assuming you have provided your reader with the password you have set in blog setup, they should be able to access your blog and its content.
Of course, be wise as to who you invite to view your content as removing them would require that you change the password and notify remaining readers with the new information.
One other thing, when you make changes to settings in your blog, which includes this private-option setting, it may take a while for the change to render in your device or your reader's device as most devices use a cached version to quickly load a site.
With that being the case, a prior version may be quite "sticky" and not want to render the latest version off the site. Refreshing your screen or even closing and reopening it will likely resolve this.
If this little upgrade suits you, give it a run. Let me know what you think.
Regards,
Kermit
